In this article, we will take a closer look at how to use Novastar Viplex Express!
We will explain step by step how to install, how to upload media resources and how to ensure that the content is displayed properly on your LED display. This software works perfectly with many well-known LED controllers produced by Novastar! Just follow our instructions and you will be able to complete the software setup easily and quickly.
1. What is ViPlex Express?
ViPlex Express is a content publishing management system for PCs that is available for Windows and allows users
Editing and playback solutions on LCD or LED displays. In asynchronous mode, ViPlex Express is also used to control multimedia players.
What is NovaStar software?
The NovaStar software product portfolio includes NovaLCT, SmartLCT and ViPlex Express, designed for LED display management, configuration and calibration. Users can use NovaStar software to edit, adjust, monitor and remotely control the content of the LED display, thereby obtaining a more flexible and efficient display effect.
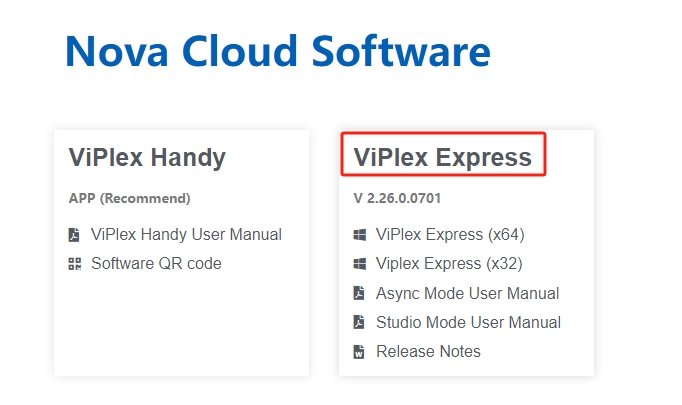
2. How to download ViPlex Express software?
3. ViPlex Express connects to monitor
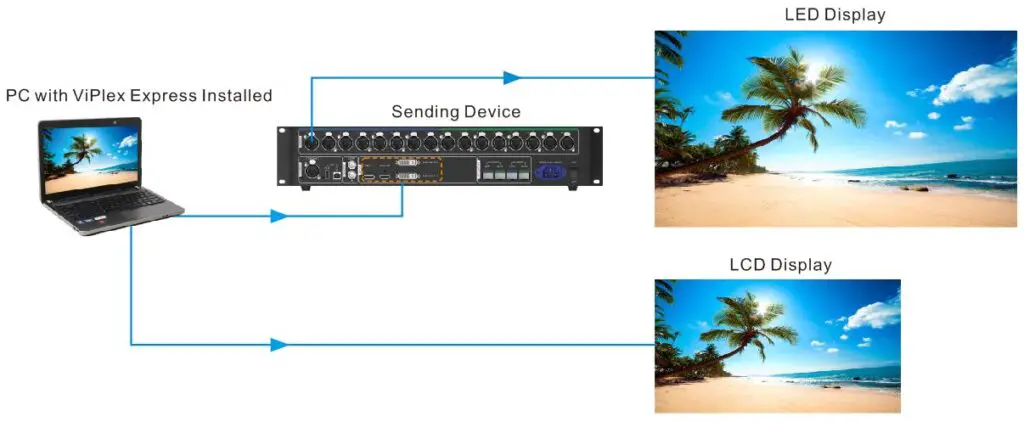
- ViPlex Express is installed on a PC, which is connected through a sending card and serves as the video source for the LED screen. For example, MCTRL4K sending device is used in the picture.
- ViPlex Express is installed on the PC, which is connected to the LCD and serves as the video source for the LCD.
4. Select working mode
After installing ViPlex Express for the first time, a select mode dialog box appears when you open ViPlex Express.
Select Studio Mode and click Open.
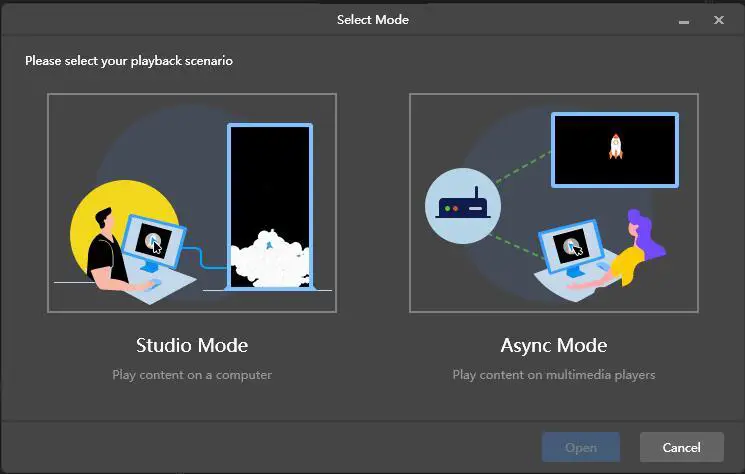
Studio mode is synchronous mode, and the Novastar Taurus series uses asynchronous mode.
3. 1 Studio mode
When we update, the solution data in async mode will be synced to studio mode.
After selecting studio mode, enter the studio mode startup page. Here we can choose regular screen or extra long screen.
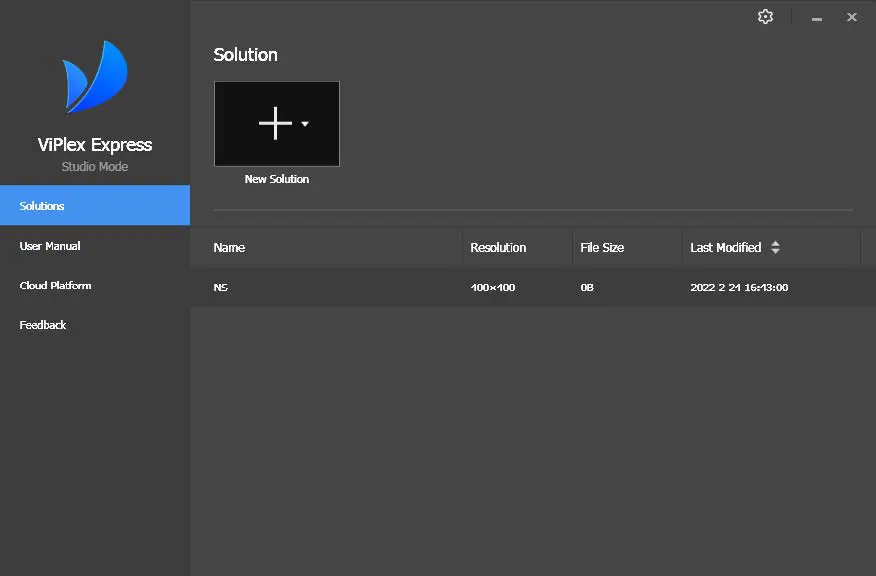
Select the General screen to access the solution edit page.
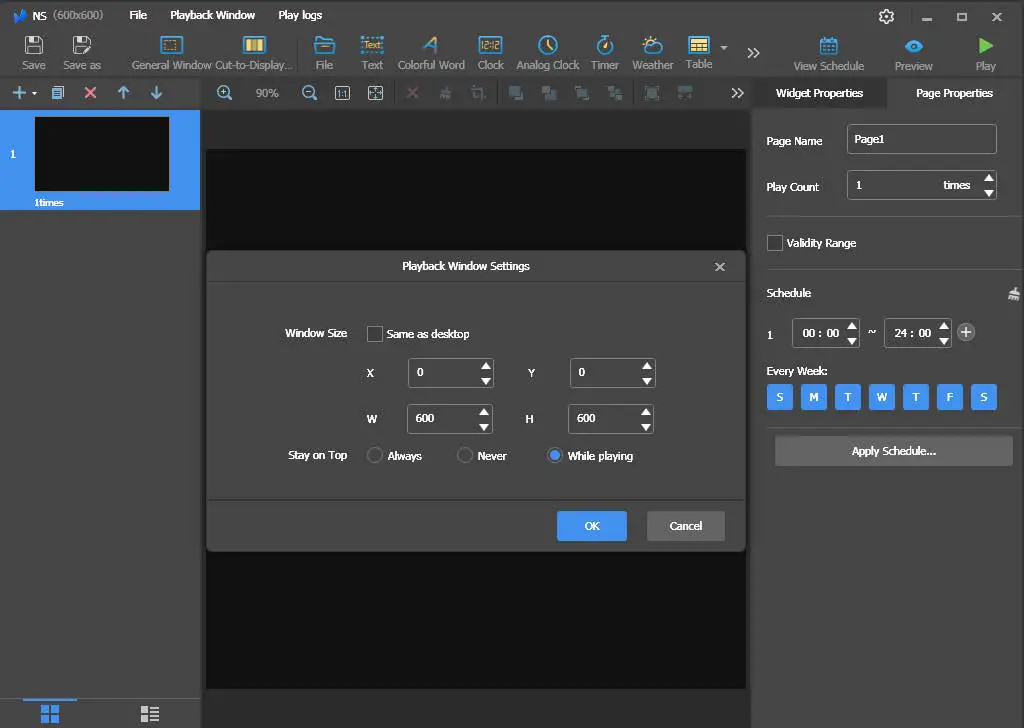
We then need to resize the canvas on the popup to the same size as the screen, i.e. width and height to 600 pixels and 600 pixels.
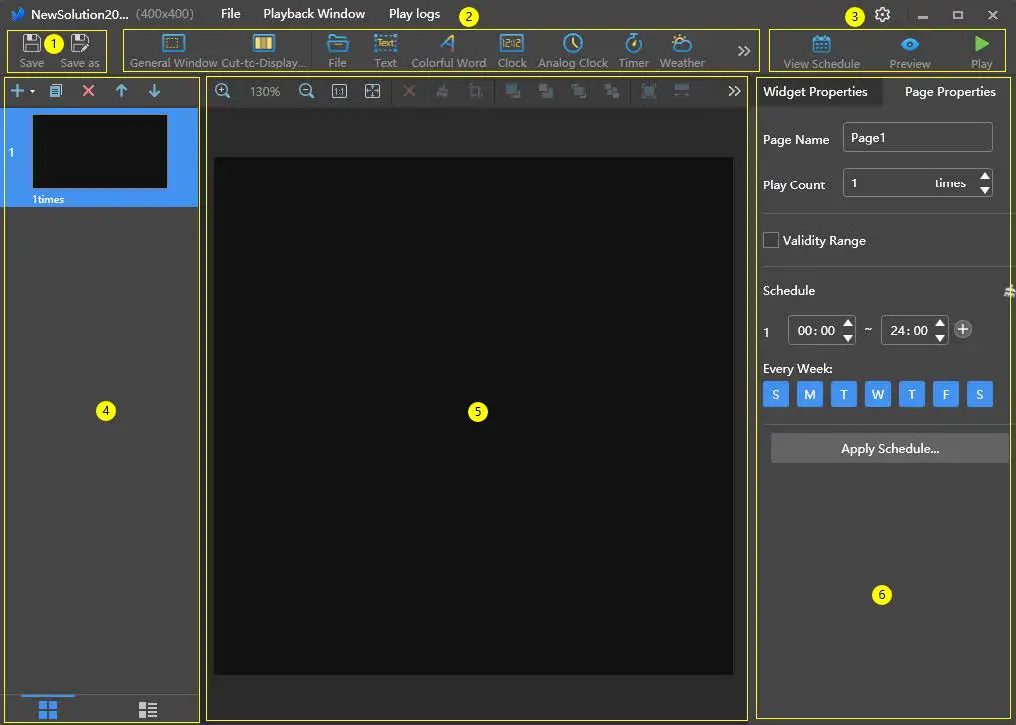
In other cases, when entering the studio mode to create a main screen plan, the plan editing page will appear, such as: files, words, clocks, analog clocks, timers, etc. You can adjust the size and position of the playback window, and choose to show or hide the playback window.
3. 2 Three steps to set up Viplex Express software
Briefly, using Viplex Express to display images and videos on your screen requires three steps:
1.Select mode, here we choose studio mode;
2.Adjust the window resolution to the same as the screen, just click “Play Window” to complete;
3.Add media such as images and videos to Viplex Express. Don’t forget to click the full screen button to automatically adjust your media to fit the screen size.
5. Basic functions of ViPlex Express
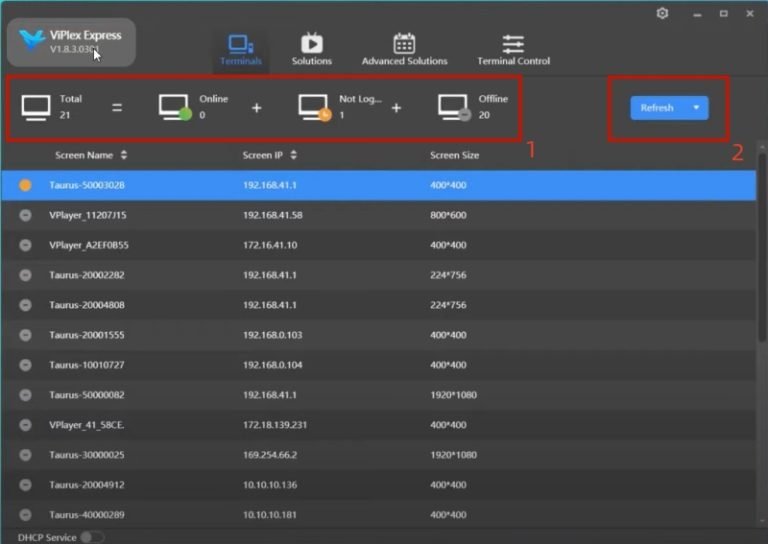
First, let’s look at the first part marked in red, number 1:
(1) Total: Displays the total number of devices.
(2) Online: This indicates that the Taurus device has been successfully connected to the PC and logged in.
(3) Not logged in: This means that the Taurus device has not been connected to the computer, or has been connected but not logged in. You need to log in to the device to access it.
(4) Offline: If this status is displayed, you need to check whether the connection is stable.
Now , we turn to the second section number 2 marked in red .
Click the “Refresh” button to search for Taurus devices by specifying the IP address.
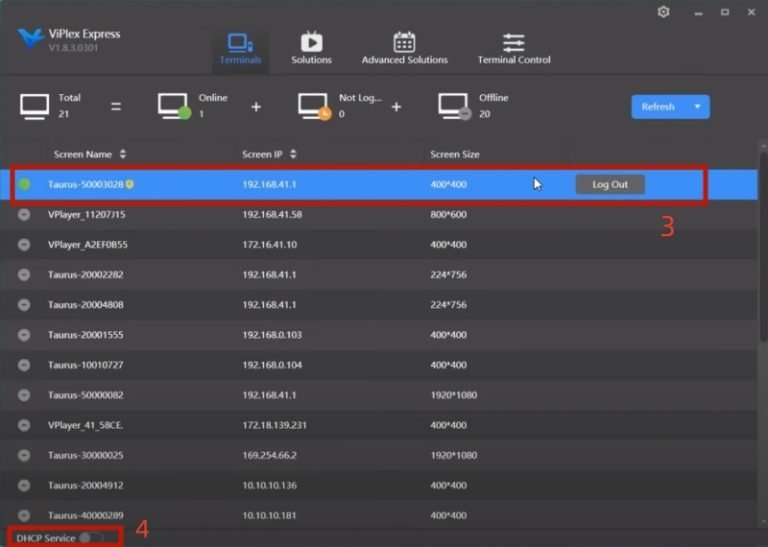
The third section will show the name of the screen, the IP address, and the size , number 3 .
Additionally, you can tap Connect to establish a connection with the screen. If the connection is successful, “Log Out” will be displayed on the interface.
In addition, clicking the button on the right will pop up a drop-down list, where you can select options such as “Rename”, “Change Password”, “Forgot Password”, etc.
The fourth part “DHCP service” refers to when you have problems connecting the Taurus series with your PC through an Ethernet cable, you can enable the DHCP service to help solve the problem , number 4 .
Please pay attention to the pop-up prompts.
6. Solution Management for ViPlex Express
In this section, you’ll learn how to add and edit solutions, and manage your solution list.
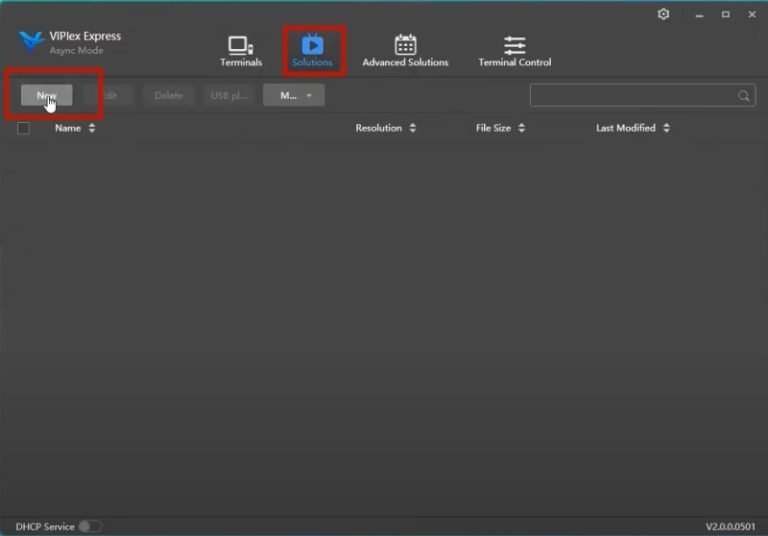
First, click “Solution” to enter the relevant interface, then click “New” to add a new solution list and name it. You can also choose the end device to automatically set the resolution.
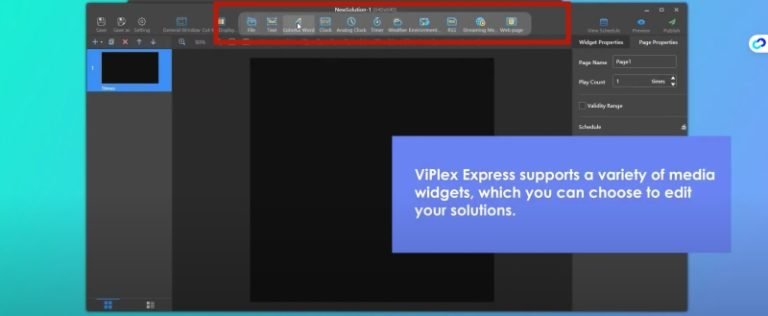
Next, you will enter the solution editing interface. Here you can customize your solution by choosing from a variety of media widgets, such as files, pictures, text, clocks, and more.
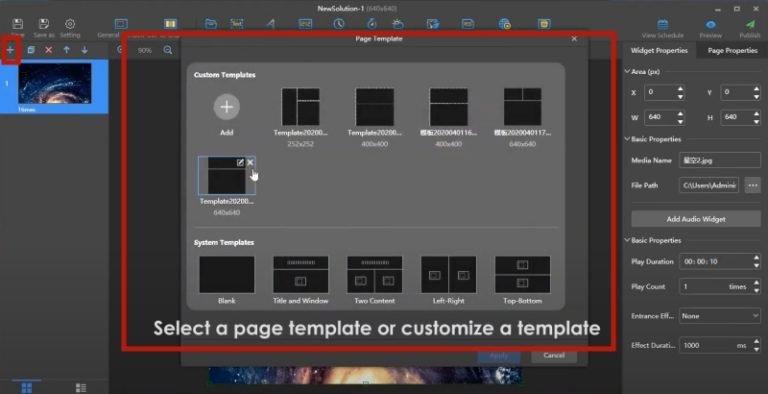
You can also choose from different page templates or customize them as needed. In various sections of the template, you can insert different types of media.
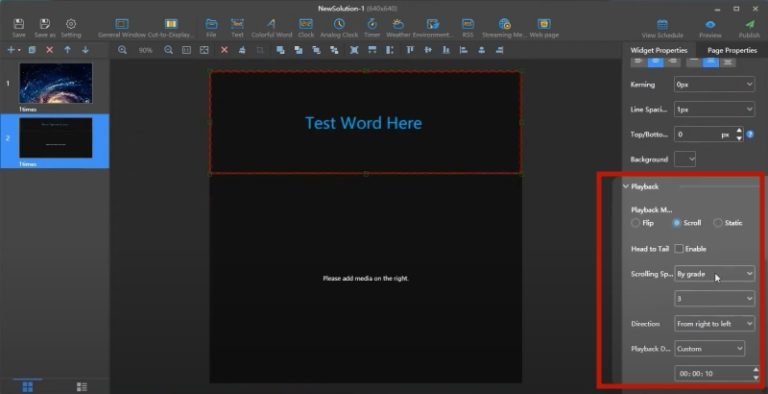
By scrolling down the right panel you can set the solution’s playback mode.
In the page properties interface, you can schedule each page to form a scheduling list for the entire solution.
After completing the settings, you can click the “Preview” button in the upper right corner of the interface to see the effect of the solution.
7. ViPlex Express USB playback solution
First, click “Solution” and then select “USB Playback” as shown in the figure below.
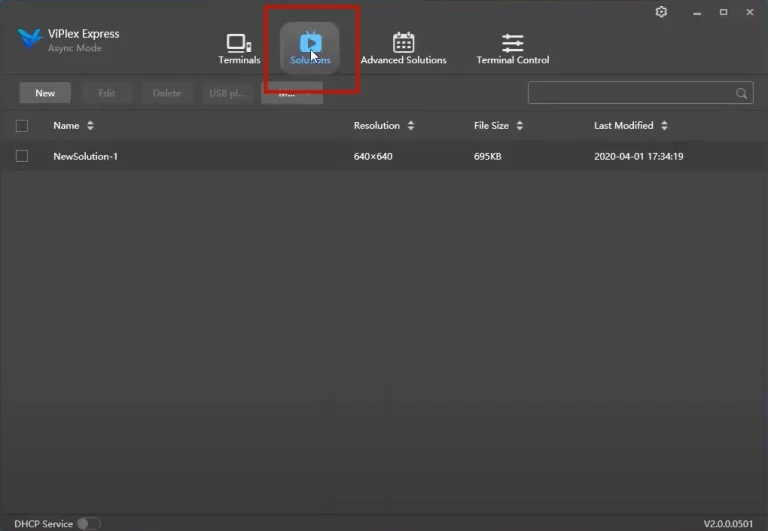
Just click the USB Play icon or button to create a USB Play solution!
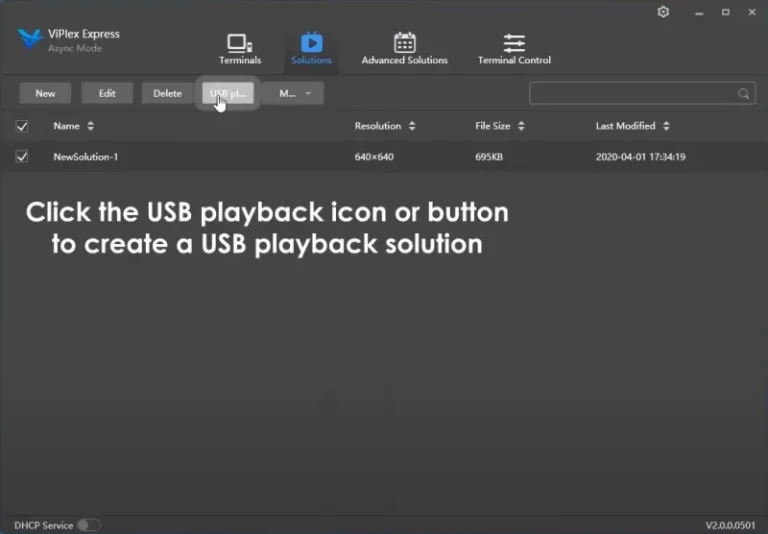
In the pop-up window, select “Plug and Play”.
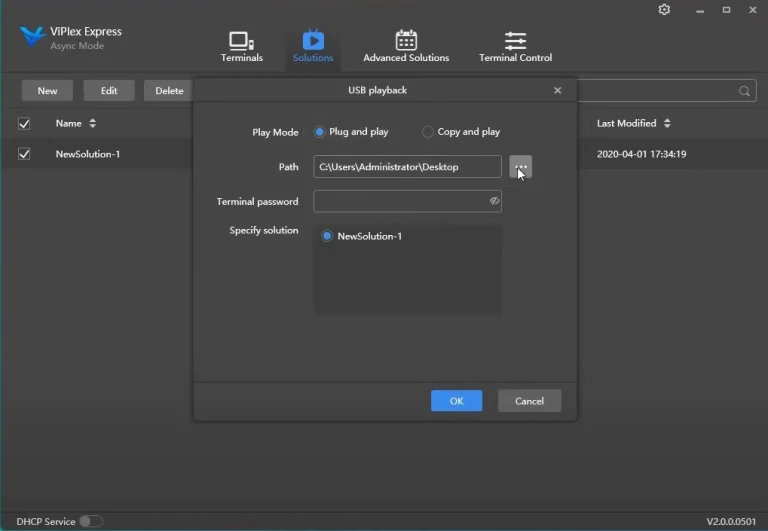
Next, select a USB flash drive to save the solution to. You will also need to enter your Taurus player login password.
Click OK to export the solution.
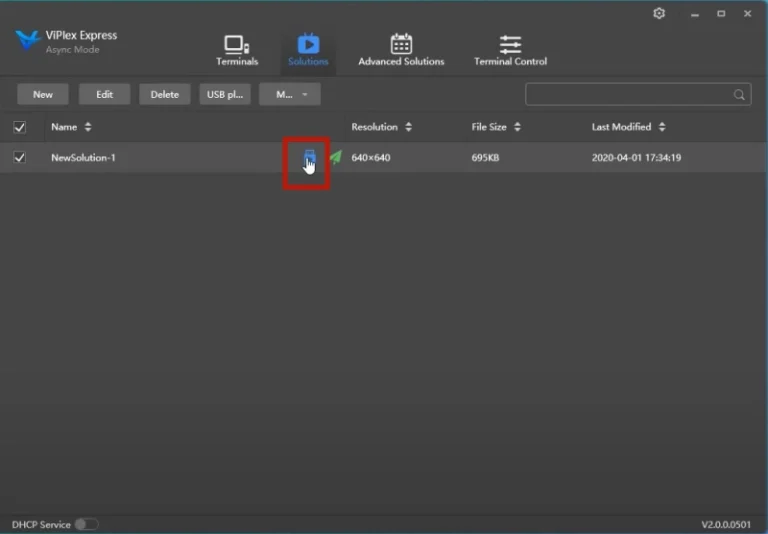
After returning to this page, as shown below, click the icon in the red box.
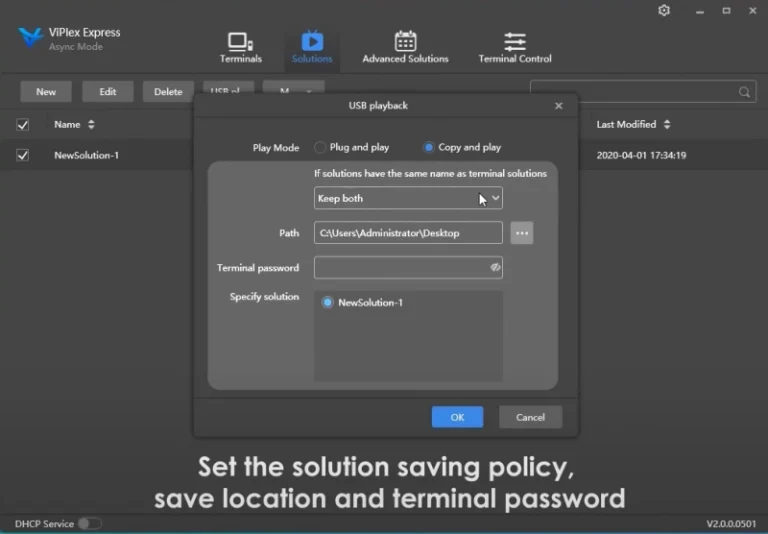
In the pop-up window, select the Copy and Play button and set the save policy, save location, and terminal password for the solution.
Click OK to export the solution.
8. ViPlex Express FAQ
What video formats does Studio Mode support?
Studio mode supports the following video formats:
*.3g2, *.3gp, *.3gp2, *.3gpp, *.amv, *.asf, *.avi, *.bik, *.bin, *.divx, *.drc, *.dv, *. f4v, *.flv, *.gvi, *.gxf, *.iso, *.m1v, *.m2v, *.m2t, *.m2ts, *.m4v, *.mkv, *.mov, *.mp2, *.mp4, *.mp4v, *.mpe, *.mpeg, *.mpeg1, *.mpeg2, *.mpeg4, *.mpg, *.mpv2, *.mts, *.mxf, *.mxg, *. nsv, *.nuv, *.ogg, *.ogm, *.ogv, *.ps, *.rec, *.rm, *.rmvb, *.rpl, *.thp, *.tod, *.ts, *.tts, *.txd, *.vob, *.vro, *.webm, *.wm, *.wmv, *.wtv, *.xesc
AVI only supports the following video encoding formats:
MPEG-2, MPEG-4, MPEG-4 ASP, H.264, DivX 4/5/6, XviD, SV1, 3ivX D4, H.264/MPEG-4 AVCMKV, AMR, Web Medium, WMV, MP3. For example, AVI videos in DX50 and MP4V formats cannot be played.
When a video format is not supported, it is recommended that you use professional video format conversion software to convert the video to MP4 format.
9. In conclusion
This article is designed to guide you through the process of understanding and using Viplex Express software. We provide download resources for Viplex Express software and also come with a basic configuration guide for the popular Novastar software to help you easily complete the setup!


